How to Build a Fireplace
It had long been a dream of mine to have a fireplace in our home. After DIYing built-ins in our family room, it felt like the right place to build a fireplace!

The family room is on the second floor of our home, so my best option was to use an electric fireplace insert and build a surround for it. After lots of Pinterest searching and considering different styles, I decided on something that would give the room a cozy, organic feel. Now all that was left was figuring out how to build it!
Quick note: This post contains affiliate links. If you purchase something from a link, I will receive a small commission. This is at no extra cost to you! Thank you for your support!
Materials Needed:
Painters tape
2x4s
PowerPro screws
1/2″ plywood
Drywall sheets
Drywall screws
Corner bead
Joint compound
Cedar boards for the mantel
Drywall primer
Paint – my go to is Sherwin Williams for both their colors and quality
Bucket
Electric fireplace insert
Tools Needed:
Miter saw
Drill
Impact driver
Drywall jab saw
Drywall square
Kreg pocket-hole jig
Putty knives
Drill mixer attachment
The first thing I did was use painters tape to figure out what size I wanted the fireplace surround to be. I taped out the frame, the mantel, and where the fireplace insert would go. I also taped off the floor to figure out the depth of the surround, making sure it was deep enough for the fireplace insert to fit. I left the tape up for a few days to give myself time to see how I like the proportions of it in the room.

Once I decided on a size and dimensions I liked, it was time to start framing. I used 2x4s for all of the framing.
One side of the fireplace was lined up on a stud and one side was not. I wanted to be sure the surround was sturdy and couldn’t ever pull away from the wall, so I first attached four horizontal supports on the wall (making sure they were secured into as many studs as possible with screws).

My design had a bump out in the front for the mantel where the bottom half extends further out than the top, so to start, I built the taller back sides first. I created 2 boxes out of the 2x4s and also put support pieces in every 24 inches or so.
Then I used long screws to secure the sides into the horizontal supports. I also screwed the side lined up on the stud into the stud and screwed the other side into the drywall as well.

Then it was time to start building out the front. I made 2 more boxes to the height of where I wanted the mantel and then used screws to attach them to the front of the taller sides.
Then I worked on the rest of the framing for the front and the support for the fireplace insert. I made a box for the base and also framed out around where the fireplace insert would go. This insert needed to sit on a base so I cut one out of ½” plywood. I finished the front off with one last box above the fireplace for the mantel to sit on.

I knew I wanted to hang a TV on the fireplace so I added in horizontal pieces between the two taller back sides. It would have been easier to do this before securing the front, but planning this framing all out felt like a puzzle and I wasn’t always sure what one step ahead looked like! That’s part of the fun of DIY, figuring things out as you go and coming up with solutions for the things you don’t know ahead of time.
I screwed in one 2×4 so that the thinner side was facing up and then added a second one on top of that that sat with the wider side facing up. The reason for adding the one on the bottom was that it will hold more pressure with the weight of the vertical beams facing that way as opposed to just using one flat 2×4. I then added a 2×4 to the ceiling and vertical supports between the beams.
This was what it looked like with all the framing done!

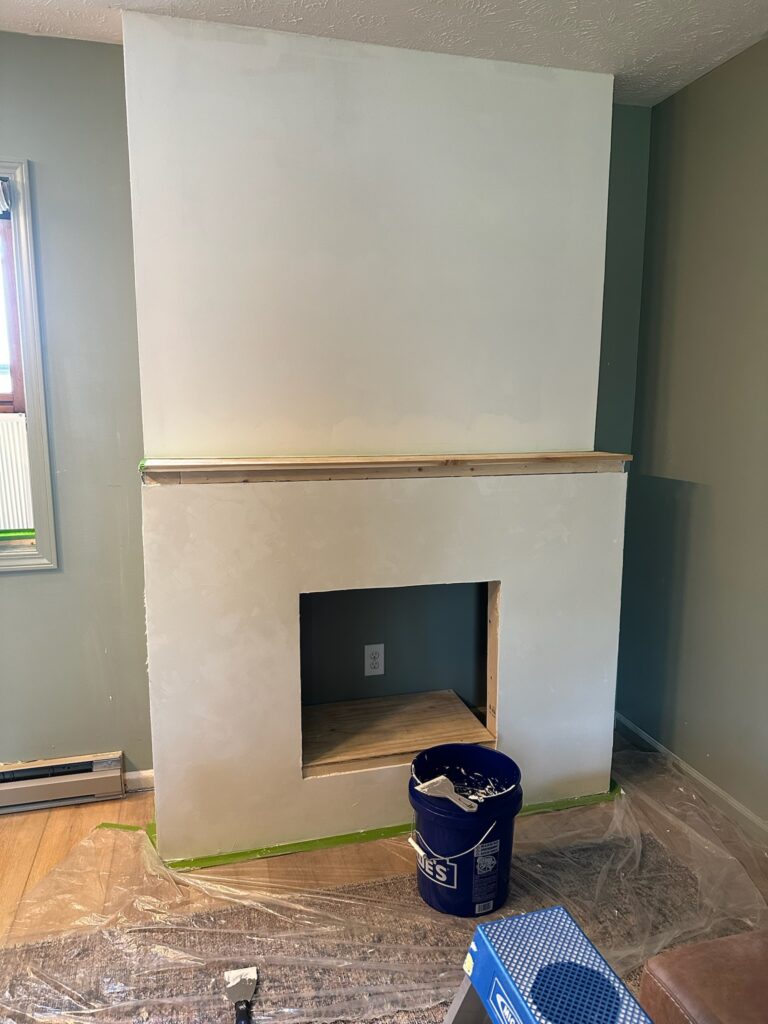
Then it was time for drywall. I’ll be honest, I am not a fan of drywalling. I’ve done it a few times now and don’t feel like I’m getting any better at it – ha! But it was necessary to get this fireplace done!

I covered the entire frame with drywall except for right underneath where the mantel would go so I would have access to screw the cedar boards to the frame from underneath so they aren’t visible on top.

For the mantel, I used a 1×6 and a 1×4 cedar board that I joined together using pocket screws. It was my first time using a Kreg pocket-hole jig, and it made me feel more like a woodworker! With the mantel the depth I needed, I attached it to the 2×4 framing with screws from underneath.

I also decided at the last minute to add a 1×2 cedar board to the front of the fireplace to give the mantel a bit more of a chunkier appearance. I love the way cedar looks but with the boards just sitting on top, you really couldn’t see much of it unless you were standing right at the fireplace! Adding the 1×2 to the front was definitely the right decision!

After the drywall pieces were all cut and screwed in, it was time to finish all the mudding and sanding. This is absolutely the part I wish I’d hired out!😂 I don’t have much advice for this part other than don’t worry about building the mud up too much at once, small layers is the way to go.

To finish the fireplace, I wanted to try a DIY Roman clay finish I had seen shared on Instagram. To create it, I mixed equal parts joint compound and paint. I used Sherwin Williams Shoji White paint, and the color pairs so well with the Evergreen Fog walls and Urbane Bronze built-ins that are also in the room! I did use a drywall primer on the entire fireplace first, but I’m not sure that was a necessary step!
I did two coats of the Roman clay. I’ll admit, once it dried it didn’t have the color variation that I’d hoped for. I think this is due to using a light paint color. But it does have movement and texture (even if you have to get pretty close to notice!).

With the Roman clay finished, it was time to add the electric fireplace insert. I used an Ambe 30” square electric fireplace. Unfortunately they are no longer in business, but there are lots of different electric fireplace options online!
One final note: I planned the fireplace to be built around an outlet. This way I could plug in both the fireplace and a TV behind the surround and there would be no wires showing.

I really, really love how the fireplace turned out! I love the organic texture, the cedar boards, the color – there’s nothing I would change about it!

And one of the best parts about this DIY is how affordable it is. The materials for this fireplace cost me less than $300 (this doesn’t include the cost of the electric fireplace insert). It completed our family room and adds an incredible cozy factor!
